Showing posts with label Home Decor. Show all posts

Wednesday, June 4, 2014

Currently Loving...Blue Velvet and Emerald Taffeta

We've had quite the whirlwind few weeks here at Sorella Style!  Kacey had her adorable little baby girl 2 weeks ago today - Miss Stella Francesca made quite the entrance!  Kara has been travelling all over - out to California for the birth, back to Denver, then soon back out to Cali for my baby girl to be born!  2 weeks and counting down...

While I (patiently?) wait for that day to arrive, I've been catching up on my favorite websites, blogs, and pinterest pages...here are my current loves.


One day I will have a blue velvet sofa.  I'm loving this one from a Home Tour on The Everygirl.  And I'm also loving the artwork above the sofa....do we think I could recreate??  Digging all the colors, especially the pops of gold.


Can we HANDLE how magical this photo is!?  I'm dying over the gorgeous ocean echoing the sunset in the clouds...and the emerald skirt!  I may have to scoop one of these up on Bel and Beau's website...a little post-pregnancy gift to myself? I could wear it this Fall when I'm back at...shall we say fighting weight!?

Cheers, dolls....happy inspiration hunting!

xo,
Kate

Wednesday, May 7, 2014

HGTV Brother Vs. Brother: Styling a Room 2 Different Ways!

HGTV

I'm excited to finally announce my involvement with the new season of Brother Vs. Brother on HGTV!  I worked on HGTV Design Star last year, and this year HGTV hired me to work on Brother Vs. Brother.  We filmed the first couple months of this year, and the new season starts on Sunday, June 8th!

Check out this video below that we styled in partnership with Home Decor Website Wayfair.  I'll share more details of my specific role with the show as we get into airing it (Oh confidentiality agreement :).  But here is a video we made using Wayfair goods to spruce up your living room 2 different ways - A Summer Look and a Fall Look.


Here is a direct link to the video:
http://www.hgtv.com/video/wayfair-home-furnishing-tips-video/index.html

It's been a fun first half of the year working with HGTV!  I can't wait for you all to see the show!

xo,
Kate

Tuesday, April 29, 2014

DIY Kitchen Chalkboard


I love an easy craft project that makes a big difference :)  And let's be honest, chalkboard paint could not be easier to work with.   Especially the spray paint version!  For quite awhile now I've been meaning to buy a magnet pad of paper to put on my refrigerator so I can jot down those grocery store items I need to buy that I think about in the moment of cooking but ALWAYS forget once I get to the store.  Does that ever happen to you?  

However, I've had this empty wall in my kitchen since we moved in.  I thought I'd get around to finding art or something to fill the hole eventually, but then I came across this old tray that I got at the flea market a hundred years ago.  Boom! Let's make a chalkboard, hang it in the empty space, and now I can add items to buy as I think of them.  Ahhhh I love efficiency.

DIY Kitchen Chalkboard
Old Tray
Painters Tape
Chalk

1.) Tape off edges of tray with painters tape.

2.) Spray chalkboard paint on face of tray.  
I sprayed 3 coats, taking about a 2 minute break between coats.

3.) Wait 24 hours. (Hardest part! Ah patience!)

4.) Cure chalkboard by covering the entire area with chalk.  
Wipe off chalk and voila!

5.) List away!


I had to add a small sawtooth picture hanger to the back of my chalkboard.  You can buy these at any hardware store - I happened to have some in my tool box.  They come with tiny screws, you just grab a screw driver and screw them into the back of your tray.  Then I attached some kitchen twine to the back, and hung the tray on the wall.

The Painters tape actually pulled off a little of the old paint from the original tray.  But it ended up making the sign look even better! Unintentional distressing :)


I love how it fills up that empty wall and lets me remember what I actually need from the store!  Win, win.

xo,
Kate

Monday, April 28, 2014

Kate's Nursery Inspiration: A Bohemian Baby Room


It's time.  Kacey has officially shamed me into starting on my nursery :)  Hers is SO CUTE! Check out her progress here, here, and here.  I've decided to go colorful and bohemian in our nursery.  I want it to be comfy, cozy, and inspiring for baby Bean!  You can see some of my inspiration photos below...lots of jewel tones, pattern...indigo, magenta, gold, turquoise....whimsical and fun!


Images clockwise from left 1 | 2 | 3

And here is my inspiration board...These are the images that are driving me creatively now.  I've linked to the below photos, but I plan to DIY some of these items, flea market find others, and re-purpose pieces we already have in our home.  Updates on real progress to come!

It's GO TIME!

xo,
Kate


1.) Dresser

Wednesday, April 23, 2014

Baby Room Update! DIY Shelves for Kacey's Nursery

Ok kids! Here are the fun shelves Kate and I ended up painting for the Baby's room! They turned out so cute and pretty, and I just had to share them with you!


Step 1: Buy these $7.99 shelves from Ikea.  They come with metal hinges and are super easy to drill into the wall.

Step 2: Dry brush an antique white paint onto all sides of the shelves.  Use a large dry paint brush and dip a small amount of paint onto it.  Then brush it on to the shelf in a coarse, carefree manner.  It creates a lovely farmhouse feel to the shelves. Let dry (doesn't take long!).

Step 3:  Decide what shapes you want to paint onto the shelves so you can tape off the patterns.  We used painters tape. You need to paint on all sides of shelf because you'll be able to see the bottom as well as the top.  This was the fun creative part! We went with some simple stripes on one, and got funky and whimsical on the third!

Step 4:  Paint! We chose 4 different colors from Michaels, but the world is your oyster on this one. 


You need to go slow and really plan out which color should go where.  The paint dries fairly quickly though, so this project can be accomplished in one afternoon!


And before you know it...the tape comes off and.....voila!!


3 fun, different, whimsical shelves!


This baby hasn't even arrived yet, and I've already managed to fill up all available space:)


Enjoy crafting!! I know I did...this one was a fun one!

Love!
Kacey

Thursday, April 17, 2014

Simple, Glittery Easter Table


Welcome to our Easter table!

For some reason, the Easter holiday always sneaks up on me.  Thanksgiving, Christmas - we have major build up for those guys.  But all of a sudden, spring has sprung, and Easter is here.  For that reason, I like to create really simple but festive tables for the spring holiday set up.  I actually had all of the items for this table - I just rummaged around all of my "hiding spots"....don't tell my husband how many hiding spots I actually have :)

This year we incorporated:


The DIY project for this year are these glitter filled easter eggs!

DIY Glitter Filled Easter Eggs
Clear Easter eggs from Michaels ($.99 each!)

1.) Take off top of clear egg and fill up with glitter.
I filled each egg about 1/4 of the way full.

2.)  Pop top back on egg.

3.) Using a glue ballpoint pen, write down names 
for place cards on a thin strip of white paper.

4.) Sprinkle glitter over glue.

5.) Brush off glitter (funnel back into tube to re-use).

6.) Roll both ends of paper for a fancier look.


 Each place setting has a slightly different look...
Kara: old wine corks add a festive feel
Kate: dried lavender from the garden
Kacey: small white stones and mini purple carnations
Sorella: A beautiful pink flower

You could also scoop up a whole bunch of these eggs, fill them with coordinating glitter and hang them  together all at random lengths with flowers behind it as a spring wreath.  Or even hang them at various heights from your chandelier over your Easter table.  A kind of grown-up mobile!


 We actually re-used the gorgeous flower arrangement from our Baby Shower last weekend! Our dear friend Alyson created the most stunning floral arrangements - and Kacey and I got to take a few home with us.   This was perfect for the table.


Aren't they beautiful? She is so talented!  And these flowers are still fresh almost a week later.  More pictures to come from the Baby Shower, I promise. We have a whole post dedicated to it.  Our friends and family did such an amazing job on the event...can't wait to share!

Happy Easter everyone - don't forget to light some candles and use whatcha got!  Get creative, but keep it simple...works every time!

xo,
Kara, Kate, and Kacey


Wednesday, April 2, 2014

DIY Fabric Fringe Bunting


Rachel Moore Photography

I made this pretty silk fringe bunting for a DIY Wedding style shoot awhile back, however it would be perfect for all the upcoming baby showers we are hosting!  It's a simple project that makes a BIG impact.  Buntings, banners, whatever you call 'em - they are a lovely addition to any festive occasion!

DIY Silk Fringe Bunting
Fabric in colors of your choice 
(we chose ivory and champagne)
Scissors
Twine
Hot Glue

1.) Cut fabric into 17 inch squares.  
Then cut each square along diagonal to make 2 triangles.

2.) Lay the hypotenuse of the triangle facing up.  
Cut fringe strips, leaving a 1 inch border along top.

3.) Hot glue the top border of triangle to a long piece of twine,
allowing the fringe to hang  down.

4.)  Continue gluing bunting on twine until your banner is as long 
as you wish!

Hang over dessert tables, gift collections, cribs, kid's rooms, your bed!  Endless options await you!

xo,
Kate


Tuesday, March 25, 2014

BABY room Update!

Time for a BABY ROOM update!

I've been assembling pieces from all over the South Bay (and Etsy:)) for this little lady's room. (slash workout room, slash office).  

Remember my inspiration blog for the nursery?

Since then, here is what I've got goin'...

Number 1: The Crib!


We are in love with this crib so far! It was so easy to put together, the grey is PERFECT in the room, and it's streamlined and not too big for a small nursery.

Number 2: Driftwood Rods!


I wish we had access and time for foraging for our own driftwood.  Very possible if you have access to rivers, beaches.  BUT when in doubt...there is always ETSY!  Can't wait to get these rods up and have some fun decorating!

Number 3: Star Decals! 


I'm waiting to get our Blush and Ivory Decals to put above the crib on all that empty wall space. Stay tuned!

Number 4: Shelving!


These Ikea Floating Shelves were $7.99!  I cannot WAIT to DIY them up with paint, stain, leafing, who knows?!?  

Number 5: Ivory Sheepskin Rug!


So this Ikea Faux Ivory Sheepskin Rug was $9.99.  It was almost identical to the real ones they have for $29.99.  I went with the money saver!

Number 6: Lighting!


We chose this Pottery Barn Capiz Flower Pendant to hang as well.  I can't wait for it to arrive!

And finally Number 7: Mirror Rehab!

Here is the mirror we have hanging now: 


It's a little dark and heavy for the room right now.  

Here is what I saw antiquing the other day and got INSPIRED!!


Phew.  That's what's going on in my house these days...LOTS of projects to DIY in the next few weeks!

Wish me luck, let me know if you have any tips or tricks as I go on this adventure!!
Love!
Kacey


Friday, March 14, 2014

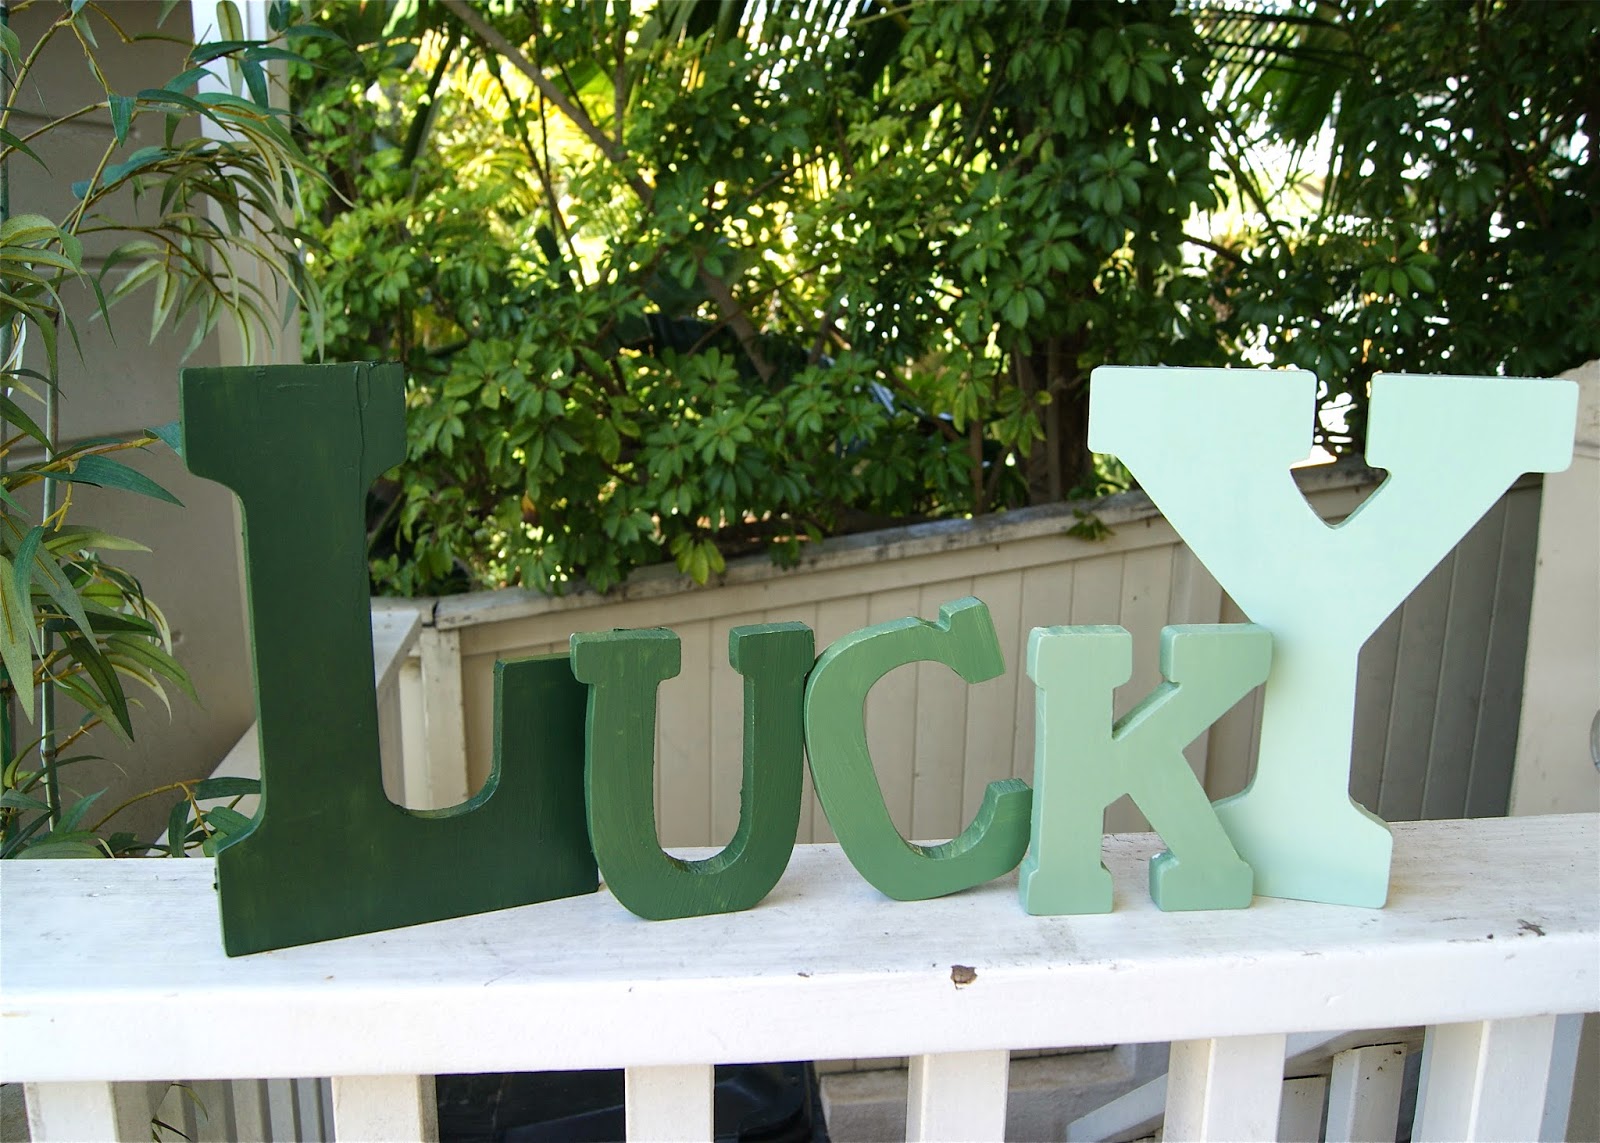
St. Patty's Day O'FUN!!! Ombre "Lucky" Sign


Who doesn't looooove a good holiday project??

I gotta be honest, I was having some trouble coming up with a fun St. Patrick's day project.  I didn't want shamrocks and pots of gold this year...just something classy, vintage-y, and fun to spruce up my house and invite the Luck O' The Irish in:)

(Side note: did you know that St. Patrick's Day is an official Christian holiday celebrating the arrival of Christianity in Ireland?  It always falls during Lent, and the Church lifts the restrictions on eating and drinking alcohol for this one day! Hence the fun filled, green beer obsessed holiday that it has now become...).

Anyhoo, I finally got inspired on a random trip to Michaels as I was meandering down the wood and paint aisle. Recently I had seen these cool ombre candlesticks online and...

EUREKA!  I knew what I wanted to do this year!

Ombre "LUCKY" letters!!  A fun little vignette to put up in the house...it's  pretty and reminds me of how "lucky" and blessed I am everyday:)  I thought adding the ombre look would spice it up a bit from just all one green color.  


SO.  I found the perfect wooden letters that would stand up on their own.  I chose a big L and Y to whimsy it up a bit.


I laid out the letters at home, along with the dark green and white all purpose paint I decided on.


There are a ton of greens and types of paint to choose from...It's up to you how dark you want to start your letters.


Then I started painting!  I used the darkest green on the 'L'.  A plastic bowl was perfect to hold the paint as I slowly added dollops of white to the green color to lighten it up.  A little white goes a long way, but it's trial and error to find the perfect ascending shades of green that you want for your sign.


I think the K could be just a scosh darker after I saw the final dried finish. I'll have to do that next time! 

This project was less than $20, and it was so much fun to get my hands dirty with some good old fashioned painting!  Like being a kid again!  I will DEFINITELY have to do a project like this with my daughter some day:)


Happy Irish Day!!
Kacey

Tuesday, March 11, 2014

DIY: Fabric Flower Wreath


After making these fabric flowers (Kate posted this DIY last Friday, check it out!) we wanted to take it to the next level and make a fun and easy spring wreath. 

These flowers are super easy to make, and if I think that, well then they must be easy! Let's get started...

 My new glue gun......


Coffee and felt cutting......


A couple flowers completed.....


This wreath cost me a total of $10.00 dollars to make and I love it! I know I would have spent a lot more on a wreath from Crate and Barrel (a weakness of mine!) 

Supplies Needed:
*1 grapevine wreath
*squares of felt in whatever colors you desire
*Glue gun and glue sticks :-)
*Scissors
*Satin ribbon for bow on top

Instructions:
*assemble flowers per tutorial link above
*glue flowers onto wreath in whatever position is your fav
*tie satin bow at length you wish your wreath to hang
*display your fabulous new wreath!


If I can do it.....you can do it!!


Happy Crafting!
xo,