Showing posts with label Nursery. Show all posts

Monday, April 28, 2014

Kate's Nursery Inspiration: A Bohemian Baby Room


It's time.  Kacey has officially shamed me into starting on my nursery :)  Hers is SO CUTE! Check out her progress here, here, and here.  I've decided to go colorful and bohemian in our nursery.  I want it to be comfy, cozy, and inspiring for baby Bean!  You can see some of my inspiration photos below...lots of jewel tones, pattern...indigo, magenta, gold, turquoise....whimsical and fun!


Images clockwise from left 1 | 2 | 3

And here is my inspiration board...These are the images that are driving me creatively now.  I've linked to the below photos, but I plan to DIY some of these items, flea market find others, and re-purpose pieces we already have in our home.  Updates on real progress to come!

It's GO TIME!

xo,
Kate


1.) Dresser

Wednesday, April 23, 2014

Baby Room Update! DIY Shelves for Kacey's Nursery

Ok kids! Here are the fun shelves Kate and I ended up painting for the Baby's room! They turned out so cute and pretty, and I just had to share them with you!


Step 1: Buy these $7.99 shelves from Ikea.  They come with metal hinges and are super easy to drill into the wall.

Step 2: Dry brush an antique white paint onto all sides of the shelves.  Use a large dry paint brush and dip a small amount of paint onto it.  Then brush it on to the shelf in a coarse, carefree manner.  It creates a lovely farmhouse feel to the shelves. Let dry (doesn't take long!).

Step 3:  Decide what shapes you want to paint onto the shelves so you can tape off the patterns.  We used painters tape. You need to paint on all sides of shelf because you'll be able to see the bottom as well as the top.  This was the fun creative part! We went with some simple stripes on one, and got funky and whimsical on the third!

Step 4:  Paint! We chose 4 different colors from Michaels, but the world is your oyster on this one. 


You need to go slow and really plan out which color should go where.  The paint dries fairly quickly though, so this project can be accomplished in one afternoon!


And before you know it...the tape comes off and.....voila!!


3 fun, different, whimsical shelves!


This baby hasn't even arrived yet, and I've already managed to fill up all available space:)


Enjoy crafting!! I know I did...this one was a fun one!

Love!
Kacey

Wednesday, April 2, 2014

DIY Fabric Fringe Bunting


Rachel Moore Photography

I made this pretty silk fringe bunting for a DIY Wedding style shoot awhile back, however it would be perfect for all the upcoming baby showers we are hosting!  It's a simple project that makes a BIG impact.  Buntings, banners, whatever you call 'em - they are a lovely addition to any festive occasion!

DIY Silk Fringe Bunting
Fabric in colors of your choice 
(we chose ivory and champagne)
Scissors
Twine
Hot Glue

1.) Cut fabric into 17 inch squares.  
Then cut each square along diagonal to make 2 triangles.

2.) Lay the hypotenuse of the triangle facing up.  
Cut fringe strips, leaving a 1 inch border along top.

3.) Hot glue the top border of triangle to a long piece of twine,
allowing the fringe to hang  down.

4.)  Continue gluing bunting on twine until your banner is as long 
as you wish!

Hang over dessert tables, gift collections, cribs, kid's rooms, your bed!  Endless options await you!

xo,
Kate


Tuesday, March 25, 2014

BABY room Update!

Time for a BABY ROOM update!

I've been assembling pieces from all over the South Bay (and Etsy:)) for this little lady's room. (slash workout room, slash office).  

Remember my inspiration blog for the nursery?

Since then, here is what I've got goin'...

Number 1: The Crib!


We are in love with this crib so far! It was so easy to put together, the grey is PERFECT in the room, and it's streamlined and not too big for a small nursery.

Number 2: Driftwood Rods!


I wish we had access and time for foraging for our own driftwood.  Very possible if you have access to rivers, beaches.  BUT when in doubt...there is always ETSY!  Can't wait to get these rods up and have some fun decorating!

Number 3: Star Decals! 


I'm waiting to get our Blush and Ivory Decals to put above the crib on all that empty wall space. Stay tuned!

Number 4: Shelving!


These Ikea Floating Shelves were $7.99!  I cannot WAIT to DIY them up with paint, stain, leafing, who knows?!?  

Number 5: Ivory Sheepskin Rug!


So this Ikea Faux Ivory Sheepskin Rug was $9.99.  It was almost identical to the real ones they have for $29.99.  I went with the money saver!

Number 6: Lighting!


We chose this Pottery Barn Capiz Flower Pendant to hang as well.  I can't wait for it to arrive!

And finally Number 7: Mirror Rehab!

Here is the mirror we have hanging now: 


It's a little dark and heavy for the room right now.  

Here is what I saw antiquing the other day and got INSPIRED!!


Phew.  That's what's going on in my house these days...LOTS of projects to DIY in the next few weeks!

Wish me luck, let me know if you have any tips or tricks as I go on this adventure!!
Love!
Kacey


Tuesday, March 4, 2014

Baby Room Inspiration!

We're expecting a sweet little girl in May, and it can be so easy to get lost in a sea of pink the second friends and family find out:)

I really want to create a space in our tiny second bedroom that is girly, but still functional for other things (aka part time office, workout room, Rossi's closet...eh hem...).

My sister in law, Natalie, sent me this picture... and I immediately fell in love with the color scheme! 


The subtle blush, almost champagne pink adds such a wonderful girl touch without going overboard.  Our walls are already sage green so I'm halfway there!  I want to bring in the beachy-driftwood element of the flooring...which I just found inspiration for:


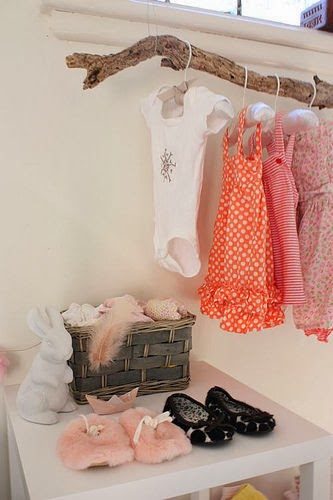
How cute is the driftwood hanger to show off some of her fabulous clothes?! I see DIY projects in my very near future:)  I still need to figure out how to get the blush into the room.  It will probably be in the crib sheets.  I had the absolute pleasure of attending my first baby shower in Arkansas last week and THIS was the handmade table cloth our dear friends Tawana and Lynette had made:


IS it NOT the prettiest thing you've ever seen?  I now need that for my crib skirt!!!

I'll keep y'all posted on how this small space nursery turns out...wish me luck!!

LOVE LOVE:)
Kacey