Showing posts with label Inspiration. Show all posts

Wednesday, June 4, 2014

Currently Loving...Blue Velvet and Emerald Taffeta

We've had quite the whirlwind few weeks here at Sorella Style!  Kacey had her adorable little baby girl 2 weeks ago today - Miss Stella Francesca made quite the entrance!  Kara has been travelling all over - out to California for the birth, back to Denver, then soon back out to Cali for my baby girl to be born!  2 weeks and counting down...

While I (patiently?) wait for that day to arrive, I've been catching up on my favorite websites, blogs, and pinterest pages...here are my current loves.


One day I will have a blue velvet sofa.  I'm loving this one from a Home Tour on The Everygirl.  And I'm also loving the artwork above the sofa....do we think I could recreate??  Digging all the colors, especially the pops of gold.


Can we HANDLE how magical this photo is!?  I'm dying over the gorgeous ocean echoing the sunset in the clouds...and the emerald skirt!  I may have to scoop one of these up on Bel and Beau's website...a little post-pregnancy gift to myself? I could wear it this Fall when I'm back at...shall we say fighting weight!?

Cheers, dolls....happy inspiration hunting!

xo,
Kate

Thursday, May 8, 2014

DIY: Stenciled Water Carafes


We made these pretty, simple, and functional table numbers for a wedding photo shoot awhile back. You too can make your own water carafe table numbers!

 I also thought they would be super cute for Mother's Day.  Instead of stenciling numbers, why not stencil "Mom" or a heart?  The options are endless.  Here's your How To:

Stenciled Water Carafe
 Glass Carafe 
(buy at any home store: Sur La Table, Home Goods, Target, etc)
Craft paint
Paintbrush
Stencils (or make your own!)*
Tape

1.) Tape stencil to outside of water jug.
*(To make your own stencil, find numbers online - google images or find a font you love - and enlarge them to the correct size to fit on the outside of the jug.  Print and cut out center to use as a stencil).

2.)  Using craft paint, paint in the stencil.

3.) Remove the stencil, and fill the jug with water....or wine!

Rachel Moore Photography

Wednesday, May 7, 2014

HGTV Brother Vs. Brother: Styling a Room 2 Different Ways!

HGTV

I'm excited to finally announce my involvement with the new season of Brother Vs. Brother on HGTV!  I worked on HGTV Design Star last year, and this year HGTV hired me to work on Brother Vs. Brother.  We filmed the first couple months of this year, and the new season starts on Sunday, June 8th!

Check out this video below that we styled in partnership with Home Decor Website Wayfair.  I'll share more details of my specific role with the show as we get into airing it (Oh confidentiality agreement :).  But here is a video we made using Wayfair goods to spruce up your living room 2 different ways - A Summer Look and a Fall Look.


Here is a direct link to the video:
http://www.hgtv.com/video/wayfair-home-furnishing-tips-video/index.html

It's been a fun first half of the year working with HGTV!  I can't wait for you all to see the show!

xo,
Kate

Tuesday, April 29, 2014

DIY Kitchen Chalkboard


I love an easy craft project that makes a big difference :)  And let's be honest, chalkboard paint could not be easier to work with.   Especially the spray paint version!  For quite awhile now I've been meaning to buy a magnet pad of paper to put on my refrigerator so I can jot down those grocery store items I need to buy that I think about in the moment of cooking but ALWAYS forget once I get to the store.  Does that ever happen to you?  

However, I've had this empty wall in my kitchen since we moved in.  I thought I'd get around to finding art or something to fill the hole eventually, but then I came across this old tray that I got at the flea market a hundred years ago.  Boom! Let's make a chalkboard, hang it in the empty space, and now I can add items to buy as I think of them.  Ahhhh I love efficiency.

DIY Kitchen Chalkboard
Old Tray
Painters Tape
Chalk

1.) Tape off edges of tray with painters tape.

2.) Spray chalkboard paint on face of tray.  
I sprayed 3 coats, taking about a 2 minute break between coats.

3.) Wait 24 hours. (Hardest part! Ah patience!)

4.) Cure chalkboard by covering the entire area with chalk.  
Wipe off chalk and voila!

5.) List away!


I had to add a small sawtooth picture hanger to the back of my chalkboard.  You can buy these at any hardware store - I happened to have some in my tool box.  They come with tiny screws, you just grab a screw driver and screw them into the back of your tray.  Then I attached some kitchen twine to the back, and hung the tray on the wall.

The Painters tape actually pulled off a little of the old paint from the original tray.  But it ended up making the sign look even better! Unintentional distressing :)


I love how it fills up that empty wall and lets me remember what I actually need from the store!  Win, win.

xo,
Kate

Monday, April 28, 2014

Kate's Nursery Inspiration: A Bohemian Baby Room


It's time.  Kacey has officially shamed me into starting on my nursery :)  Hers is SO CUTE! Check out her progress here, here, and here.  I've decided to go colorful and bohemian in our nursery.  I want it to be comfy, cozy, and inspiring for baby Bean!  You can see some of my inspiration photos below...lots of jewel tones, pattern...indigo, magenta, gold, turquoise....whimsical and fun!


Images clockwise from left 1 | 2 | 3

And here is my inspiration board...These are the images that are driving me creatively now.  I've linked to the below photos, but I plan to DIY some of these items, flea market find others, and re-purpose pieces we already have in our home.  Updates on real progress to come!

It's GO TIME!

xo,
Kate


1.) Dresser

Wednesday, April 23, 2014

Baby Room Update! DIY Shelves for Kacey's Nursery

Ok kids! Here are the fun shelves Kate and I ended up painting for the Baby's room! They turned out so cute and pretty, and I just had to share them with you!


Step 1: Buy these $7.99 shelves from Ikea.  They come with metal hinges and are super easy to drill into the wall.

Step 2: Dry brush an antique white paint onto all sides of the shelves.  Use a large dry paint brush and dip a small amount of paint onto it.  Then brush it on to the shelf in a coarse, carefree manner.  It creates a lovely farmhouse feel to the shelves. Let dry (doesn't take long!).

Step 3:  Decide what shapes you want to paint onto the shelves so you can tape off the patterns.  We used painters tape. You need to paint on all sides of shelf because you'll be able to see the bottom as well as the top.  This was the fun creative part! We went with some simple stripes on one, and got funky and whimsical on the third!

Step 4:  Paint! We chose 4 different colors from Michaels, but the world is your oyster on this one. 


You need to go slow and really plan out which color should go where.  The paint dries fairly quickly though, so this project can be accomplished in one afternoon!


And before you know it...the tape comes off and.....voila!!


3 fun, different, whimsical shelves!


This baby hasn't even arrived yet, and I've already managed to fill up all available space:)


Enjoy crafting!! I know I did...this one was a fun one!

Love!
Kacey

Tuesday, April 22, 2014

Free Online Meditation Conference


Meditation.....

It's very trendy these days.  Gaining popularity in mainstream media and medical circles - while being a mainstay in yoga and spiritual communities for as long as yoga and spirit have existed.  From the Mayo Clinic to MindBodyGreen to Russell Simmons to even the Harvard Business Review, everyone is touting the benefits of incorporating a meditation practice into your daily life.

...Relieve Stress
alleviate illness...
.....promote spiritual connection...
....improve relationships
enhance mental performance....

and more.

I came across this free online Meditation conference on Entheos.  Led by Yoga and Meditation teacher Ashley Turner, the conference is available to be streamed on your computer for free from April 21st through April 25th.  

Check out the Conference Overview from the En*Theos website:

Ashley interviewed 30+ world-class experts ranging on topics from the neuroscience of meditation, mindfulness based stress-reduction, Positive Psychology, Transcendental Meditation, the Mind-Body connection, Buddhism and Tantra. 

Demystify meditation, discover a wide-range of tools from many different traditions so you can choose which practice fits your personality and lifestyle and start meditating today. 

As yogis have known for centuries and scientists have more recently discovered, the benefits of meditation are profound! This conference breaks down meditation in an accessible and practical way - so even if you only have 5 minutes, you can begin a daily meditation practice.

Amazing yoga teachers, spiritual leaders, and pop culture icons are speaking during the online global conference.  Even if you can only listen to 1 or 2, it's worth it! And free!

Namaste :)


1 | 2 | 3

Thursday, April 17, 2014

Simple, Glittery Easter Table


Welcome to our Easter table!

For some reason, the Easter holiday always sneaks up on me.  Thanksgiving, Christmas - we have major build up for those guys.  But all of a sudden, spring has sprung, and Easter is here.  For that reason, I like to create really simple but festive tables for the spring holiday set up.  I actually had all of the items for this table - I just rummaged around all of my "hiding spots"....don't tell my husband how many hiding spots I actually have :)

This year we incorporated:


The DIY project for this year are these glitter filled easter eggs!

DIY Glitter Filled Easter Eggs
Clear Easter eggs from Michaels ($.99 each!)

1.) Take off top of clear egg and fill up with glitter.
I filled each egg about 1/4 of the way full.

2.)  Pop top back on egg.

3.) Using a glue ballpoint pen, write down names 
for place cards on a thin strip of white paper.

4.) Sprinkle glitter over glue.

5.) Brush off glitter (funnel back into tube to re-use).

6.) Roll both ends of paper for a fancier look.


 Each place setting has a slightly different look...
Kara: old wine corks add a festive feel
Kate: dried lavender from the garden
Kacey: small white stones and mini purple carnations
Sorella: A beautiful pink flower

You could also scoop up a whole bunch of these eggs, fill them with coordinating glitter and hang them  together all at random lengths with flowers behind it as a spring wreath.  Or even hang them at various heights from your chandelier over your Easter table.  A kind of grown-up mobile!


 We actually re-used the gorgeous flower arrangement from our Baby Shower last weekend! Our dear friend Alyson created the most stunning floral arrangements - and Kacey and I got to take a few home with us.   This was perfect for the table.


Aren't they beautiful? She is so talented!  And these flowers are still fresh almost a week later.  More pictures to come from the Baby Shower, I promise. We have a whole post dedicated to it.  Our friends and family did such an amazing job on the event...can't wait to share!

Happy Easter everyone - don't forget to light some candles and use whatcha got!  Get creative, but keep it simple...works every time!

xo,
Kara, Kate, and Kacey


Tuesday, April 15, 2014

Circle of Life...and Weekly favorites


It has been a whirlwind week and a half for us Sorelle...words that come to mind:

full
sad
Pop Pop
Gramma
Eternal
Colorado
memories
love
family
baby
pink
Beach
friends
circle of life

Our beloved grandfather, our Pop Pop, followed in our dear Gramma's footsteps and went to heaven a mere 2 months after she did.  It's a true love story - and now they are together again.  Kacey and I traveled to Denver last week for the celebration of his life.  Then everyone turned around and traveled right back to Southern California for our joint baby shower...talk about the circle of life.  Both events were truly lovely, touching, and life affirming.  More to come on the gorgeous baby shower, but for now, here are a few articles that have caught my eye over the past few weeks. Enjoy!


How to Make your bedroom an allergy free zone on Apartment Therapy

Friday, March 28, 2014

Sorella Spotlight: BABY EDITION! Pretty Pushers Delivery Gowns...

As THE MOMENT gets closer, and by moment I mean actually having this baby, I can't help but start to obsess about the details of this unprecedented event.  I know, I know, as my mother says, "women have been squatting in fields for thousands of years (yeesh, mom...:))", this happens to be my first time and needless to say, I'm a little....apprehensive, shall we say?!?!

Anyhoo, anything that can make this blessed event just a little more blessed is on my radar right now.  My prenatal yoga class is a lifesaver (yoga works-Patricia Grube!), and we were recently introduced to Pretty Pushers Delivery Gowns. 

These Pretty Delivery Gowns come in all kinds of colors, and have the perfect openings for fetal monitors, epidural access, and medical assistance.  And they are WAY better than the scratchy hospital gowns:).  


SO! Mamas-to-be...let's stay comfortable and feel a little more ourselves in that hospital! Check out these gowns for your upcoming MOMENT.  They are only $29.99...so worth it!!

Have a lovely weekend!
Kacey

Friday, March 7, 2014

DIY: Fabric Flowers


These fabric flowers are so versatile - you can use them in many different DIY projects!  Wreaths, centerpieces, lamp shade decor, pillow appliques...endless!

I used these flowers for the centerpieces in the DIY Picnic Wedding Style Shoot I designed for Wedding 101.  Kara used them in her Spring wreath she made last year.  Use your imagination - you'll find a spot for these babies!

Fabric Flowers DIY
Fabric (used felt for these)
Scissors
Hot glue

1.)  Cut felt into equal sized squares (the bigger the square, the bigger the flower).
2.)  Out of each square, cut a 5 petal flower (Does NOT have to be pretty or even).
3.)  Fold flower in half, then in 4ths.
4.)  Cut off very bottom edge and line with hot glue.
5.)  Glue bottom of flower to a scrap piece of felt that acts as the base of the flower.
5.)  Repeat with all the petals until you have the size flower you want.


Kara's Wreath:


Lamp Shades w/Flowers:


Tuesday, March 4, 2014

Baby Room Inspiration!

We're expecting a sweet little girl in May, and it can be so easy to get lost in a sea of pink the second friends and family find out:)

I really want to create a space in our tiny second bedroom that is girly, but still functional for other things (aka part time office, workout room, Rossi's closet...eh hem...).

My sister in law, Natalie, sent me this picture... and I immediately fell in love with the color scheme! 


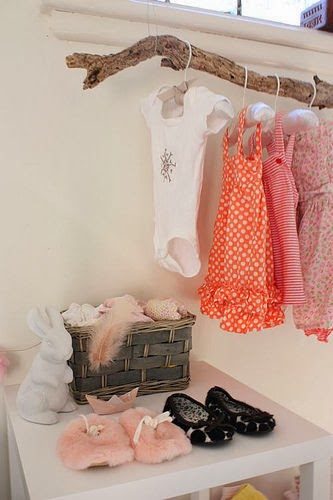
The subtle blush, almost champagne pink adds such a wonderful girl touch without going overboard.  Our walls are already sage green so I'm halfway there!  I want to bring in the beachy-driftwood element of the flooring...which I just found inspiration for:


How cute is the driftwood hanger to show off some of her fabulous clothes?! I see DIY projects in my very near future:)  I still need to figure out how to get the blush into the room.  It will probably be in the crib sheets.  I had the absolute pleasure of attending my first baby shower in Arkansas last week and THIS was the handmade table cloth our dear friends Tawana and Lynette had made:


IS it NOT the prettiest thing you've ever seen?  I now need that for my crib skirt!!!

I'll keep y'all posted on how this small space nursery turns out...wish me luck!!

LOVE LOVE:)
Kacey

DIY: Mardi Gras Mask


It's Fat Tuesday, y'all!

Otherwise (and less jarringly) known as Mardi Gras, today is the day to throw caution to the wind! Go ahead and binge, gorg, drink up life's pleasures to your heart's content!  Because Lent starts tomorrow and we throw ourselves into 40 days of restrictions..don't we?

Well, whether you do or you don't, what better way to celebrate Mardi Gras than by making your own Mardi Gras mask?  Legend has it that people wore their masks out on the Tuesday before Lent so they could frolic and play incognito.  This is a really fun, creative project! Options and designs are endless...would be great to do with kids too!

DIY: Mardi Gras Mask
Materials:
Mask
wooden dowels
craft paint and foam brush
glitter
hot glue/gun
clear craft glue
feathers
jewels
ribbons
sequins
generally any sort of bits and baubles you want to make your mask gorgeous!


1.) Paint mask a base color with a small foam brush.  I chose black paint.
2.) Once paint is dry, spread a skim of clear craft clue on mask and sprinkle on glitter.  
Once again, I went with black glitter.
3.) Using your hot glue gun, slowly glue on sequin border.  This is where you can 
start to get creative! use old beads, ribbon, shells, feathers, whatever!


4.) Wrap wooden dowel with ribbon, or paint a color of your choice.  
I wrapped the dowel with gold ribbon - hot glue the end of the ribbon to the dowel, 
wrap all the way down, then glue the bottom end.


5.) Hot glue the dowel to the back of the mask.  I also wrapped a purple ribbon around it.
6.) Attach feathers and jewels and ribbons!  I hot glued them to the back of the mask.
7.)  Tie on butterfly pin.


Viola!!

These would be very pretty and whimsical placed in a floral arrangement on your dining table, too.


You are free to masquerade, my dear :)
xo
Kate


Don't forget to keep up with SorellaStyles on Instagram! Follow us at:

@sorellastyles