Showing posts with label Furniture. Show all posts

Wednesday, June 4, 2014

Currently Loving...Blue Velvet and Emerald Taffeta

We've had quite the whirlwind few weeks here at Sorella Style!  Kacey had her adorable little baby girl 2 weeks ago today - Miss Stella Francesca made quite the entrance!  Kara has been travelling all over - out to California for the birth, back to Denver, then soon back out to Cali for my baby girl to be born!  2 weeks and counting down...

While I (patiently?) wait for that day to arrive, I've been catching up on my favorite websites, blogs, and pinterest pages...here are my current loves.


One day I will have a blue velvet sofa.  I'm loving this one from a Home Tour on The Everygirl.  And I'm also loving the artwork above the sofa....do we think I could recreate??  Digging all the colors, especially the pops of gold.


Can we HANDLE how magical this photo is!?  I'm dying over the gorgeous ocean echoing the sunset in the clouds...and the emerald skirt!  I may have to scoop one of these up on Bel and Beau's website...a little post-pregnancy gift to myself? I could wear it this Fall when I'm back at...shall we say fighting weight!?

Cheers, dolls....happy inspiration hunting!

xo,
Kate

Wednesday, May 7, 2014

HGTV Brother Vs. Brother: Styling a Room 2 Different Ways!

HGTV

I'm excited to finally announce my involvement with the new season of Brother Vs. Brother on HGTV!  I worked on HGTV Design Star last year, and this year HGTV hired me to work on Brother Vs. Brother.  We filmed the first couple months of this year, and the new season starts on Sunday, June 8th!

Check out this video below that we styled in partnership with Home Decor Website Wayfair.  I'll share more details of my specific role with the show as we get into airing it (Oh confidentiality agreement :).  But here is a video we made using Wayfair goods to spruce up your living room 2 different ways - A Summer Look and a Fall Look.


Here is a direct link to the video:
http://www.hgtv.com/video/wayfair-home-furnishing-tips-video/index.html

It's been a fun first half of the year working with HGTV!  I can't wait for you all to see the show!

xo,
Kate

Wednesday, April 23, 2014

Baby Room Update! DIY Shelves for Kacey's Nursery

Ok kids! Here are the fun shelves Kate and I ended up painting for the Baby's room! They turned out so cute and pretty, and I just had to share them with you!


Step 1: Buy these $7.99 shelves from Ikea.  They come with metal hinges and are super easy to drill into the wall.

Step 2: Dry brush an antique white paint onto all sides of the shelves.  Use a large dry paint brush and dip a small amount of paint onto it.  Then brush it on to the shelf in a coarse, carefree manner.  It creates a lovely farmhouse feel to the shelves. Let dry (doesn't take long!).

Step 3:  Decide what shapes you want to paint onto the shelves so you can tape off the patterns.  We used painters tape. You need to paint on all sides of shelf because you'll be able to see the bottom as well as the top.  This was the fun creative part! We went with some simple stripes on one, and got funky and whimsical on the third!

Step 4:  Paint! We chose 4 different colors from Michaels, but the world is your oyster on this one. 


You need to go slow and really plan out which color should go where.  The paint dries fairly quickly though, so this project can be accomplished in one afternoon!


And before you know it...the tape comes off and.....voila!!


3 fun, different, whimsical shelves!


This baby hasn't even arrived yet, and I've already managed to fill up all available space:)


Enjoy crafting!! I know I did...this one was a fun one!

Love!
Kacey

Tuesday, March 25, 2014

BABY room Update!

Time for a BABY ROOM update!

I've been assembling pieces from all over the South Bay (and Etsy:)) for this little lady's room. (slash workout room, slash office).  

Remember my inspiration blog for the nursery?

Since then, here is what I've got goin'...

Number 1: The Crib!


We are in love with this crib so far! It was so easy to put together, the grey is PERFECT in the room, and it's streamlined and not too big for a small nursery.

Number 2: Driftwood Rods!


I wish we had access and time for foraging for our own driftwood.  Very possible if you have access to rivers, beaches.  BUT when in doubt...there is always ETSY!  Can't wait to get these rods up and have some fun decorating!

Number 3: Star Decals! 


I'm waiting to get our Blush and Ivory Decals to put above the crib on all that empty wall space. Stay tuned!

Number 4: Shelving!


These Ikea Floating Shelves were $7.99!  I cannot WAIT to DIY them up with paint, stain, leafing, who knows?!?  

Number 5: Ivory Sheepskin Rug!


So this Ikea Faux Ivory Sheepskin Rug was $9.99.  It was almost identical to the real ones they have for $29.99.  I went with the money saver!

Number 6: Lighting!


We chose this Pottery Barn Capiz Flower Pendant to hang as well.  I can't wait for it to arrive!

And finally Number 7: Mirror Rehab!

Here is the mirror we have hanging now: 


It's a little dark and heavy for the room right now.  

Here is what I saw antiquing the other day and got INSPIRED!!


Phew.  That's what's going on in my house these days...LOTS of projects to DIY in the next few weeks!

Wish me luck, let me know if you have any tips or tricks as I go on this adventure!!
Love!
Kacey


Tuesday, March 4, 2014

Baby Room Inspiration!

We're expecting a sweet little girl in May, and it can be so easy to get lost in a sea of pink the second friends and family find out:)

I really want to create a space in our tiny second bedroom that is girly, but still functional for other things (aka part time office, workout room, Rossi's closet...eh hem...).

My sister in law, Natalie, sent me this picture... and I immediately fell in love with the color scheme! 


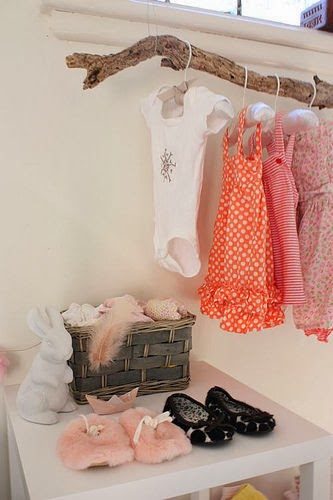
The subtle blush, almost champagne pink adds such a wonderful girl touch without going overboard.  Our walls are already sage green so I'm halfway there!  I want to bring in the beachy-driftwood element of the flooring...which I just found inspiration for:


How cute is the driftwood hanger to show off some of her fabulous clothes?! I see DIY projects in my very near future:)  I still need to figure out how to get the blush into the room.  It will probably be in the crib sheets.  I had the absolute pleasure of attending my first baby shower in Arkansas last week and THIS was the handmade table cloth our dear friends Tawana and Lynette had made:


IS it NOT the prettiest thing you've ever seen?  I now need that for my crib skirt!!!

I'll keep y'all posted on how this small space nursery turns out...wish me luck!!

LOVE LOVE:)
Kacey

Friday, June 21, 2013

HGTV Design Star!


You know those events in your life that you have to keep mum about? Especially mum since you signed a confidentiality agreement to keep mum about it?

That's been me for the past 5 months.  At the beginning of this year I began working on a TV show - the 8th season of HGTV Design Star!  I was hired as an Associate Producer, which I admit, is slightly shocking considering I've never before worked in television production.  This position, however, had to do with design, interiors, and styling - which I do so love :)

This year Design Star is partnering up with the amazing One Kings Lane.  Each episode features a One Kings Lane "pop up boutique" - sort of a "bluefly accessory wall" for the designers if you will.  The contestants are allowed to "shop" the OKL boutique for any last minute accessories or furniture they need to finish off their designs.  My job was essentially everything One Kings Lane.  From the set design, to item curating, to styling the boutique....it was wild.  It was crazy.  It was challenging.  It was amazing!

And this is pretty cool to see:


The episode 1 boutique was set up in an old warehouse.  I layered in rugs and pillows and designed shelving units to help hide the not as attractive parts of the space:


There was literally over 1,000 pieces of furniture, home decor, lighting, pillows, throws, you name it - we had it to choose from.  I had an amazing team working with me...imagine loading and unloading trucks multiple times a day for 8 weeks.  It was an intense job! But we had tons of fun and creating these spaces was an incredible experience!


So be sure to tune into HGTV Star on Sunday nights! This weeks episode features....


Yup.  Kacey and Rossi :>)

You can catch the previous 2 episodes here.

cheers!
Kate

Thursday, October 4, 2012

Before/After: Nightstands


I think most people would agree that moving into a new home (and out of an old one!) is one of the most stressful activities around.  The packing and unpacking, purging and storing decision making is a lot to take on.  But the one thing that makes all that backbreaking work worth it?  

Decorating!  

Decorating a new home is so much fun.  I've been loving the process - looking at pieces we've had for awhile, determining how to use them in different ways.  Should we donate to Goodwill? Or paint this a new color? Something bright and risky and fun? Or perhaps we play it safe and leave it as is?  The options are endless, bound only by how creative I can be...or by how inspiring Pinterest is!

As a result, I've been on a spray paint kick for the past few weeks.  And while my hands are temporarily dyed winter gray, hunter green, and primer white...the results have been worth it.  We've been needing nightstands for...oh several years now :>)  I've used mismatched side tables for much too long, so finding 2 matching nightstands has been a priority for me.  Our bed is fairly feminine with it's curvy shape and tufting.  We also recently purchased a new dresser from the flea market.  It's a distressed cream color and has an antique feel to it.  I knew I wanted the nightstands to add a contemporary layer to help balance out the other elements in the room.  

Brand new nightstands are not in the budget at the moment, so I've been searching flea markets and thrift stores high and low, keeping an open mind toward color and finish.  As long as the shape fit my modern parameters, they were in the running!  And the winners are....


Gorgeous, right? Ha! Oh these cuties needed a lot of love, but at $20 a piece at the Salvation Army store, I couldn't leave 'em behind.  And fortunately, they weren't hard to doll up...see below for the step by step process:

1:  Wash completely.  Inside, outside, take the drawers out, and clean clean clean.
2:  Remove hardware.
3:  Sand off unidentified sticky residue (I don't want to know.)
4:  Prime with Zinsser Cover Stain Primer Spray Paint (it's the best.  No need to sand or remove previous stains - it literally covers everything).
5:  Spray with color of your choice - I used Rustoleum's Dark Gray in Gloss Finish.  Buy at Lowes, Home Depot, Amazon.
6:  Seal with Minwax Water Based Polycrylic Protective Finish in Clear Gloss using a foam brush.  
7:  Reattach hardware.

I LOVE how they turned out!


What do we think?!  Have a fabulous and stylish Thursday!

xo,