Monday, March 10, 2014

Easy Peel Hard Boiled Eggs

Doesn't it just frost your cookies when you hard boil eggs, and then when you try to peel them, it's like world war 3??  No? Hmmm, well I was on a mission to figure out the best way to hard boil eggs, while making them easy to peel when the time came to eat them.  See recipe below - it's no fail!

***TIP: The older the eggs, the easier they peel too. Use up your older eggs first!

Easy Peel Hard Boiled Eggs

1.) Place eggs in pot large enough so eggs can lay in one layer.

2.) Cover eggs by at least an inch with cool to 
room temperature water.  Bring water to a boil.

3.) Let water boil for 2-3 minutes.  Then turn off heat.

4.) Cover the pot and let the eggs sit in the water for 13 more minutes.

5.) When 13 minutes are up, dump out hot water and
immediately cover eggs with cold water again.  Let eggs cool in water.

6.) Refrigerate immediately, or peel to make Deviled Eggs!


Friday, March 7, 2014

DIY: Fabric Flowers


These fabric flowers are so versatile - you can use them in many different DIY projects!  Wreaths, centerpieces, lamp shade decor, pillow appliques...endless!

I used these flowers for the centerpieces in the DIY Picnic Wedding Style Shoot I designed for Wedding 101.  Kara used them in her Spring wreath she made last year.  Use your imagination - you'll find a spot for these babies!

Fabric Flowers DIY
Fabric (used felt for these)
Scissors
Hot glue

1.)  Cut felt into equal sized squares (the bigger the square, the bigger the flower).
2.)  Out of each square, cut a 5 petal flower (Does NOT have to be pretty or even).
3.)  Fold flower in half, then in 4ths.
4.)  Cut off very bottom edge and line with hot glue.
5.)  Glue bottom of flower to a scrap piece of felt that acts as the base of the flower.
5.)  Repeat with all the petals until you have the size flower you want.


Kara's Wreath:


Lamp Shades w/Flowers:


Thursday, March 6, 2014

Stove Top Popcorn


Who doesn't love popcorn?  It is one of my favorite snacks.  But don't dare give me microwave popcorn - not when the real, stove top version is so easy to make.  And healthier!

Stove Top Popcorn
corn kernels
oil (corn oil is my fav.  Healthier oil options are olive oil or canola oil)
salt
other seasonings (optional)

1.) Pour just enough oil to skim the bottom of your pot.
2.) Sprinkle out corn kernels until they cover the bottom of the pot.
3.) Cover pot with lid.  Turn heat on high.
4.) As kernels begin to "pop" gently shake the pot so they don't burn.
*Keep puppy from going nuts once she hears the "Pop! Pop! Pop!"
**This is a near impossible task :)
5.) Once popping has significantly slowed, remove from heat and pour into bowl.
6.) Add seasonings to your liking!

Be sure to experiment with other seasonings and oils.  Infused oils impart their flavors to the kernels.  You can also use different seasonings - I like Lawrys salt, truffle salts, lemon peppers...the options are endless.


I had a particularly long day yesterday.  Fresh popped popcorn, a vanilla candle, and my DVR were just the medicine I needed to make that long day melt away.  Billy gave me this charming popcorn tub last year - you can pick up your own here.


Then there's always this one - popcorn is Cali's favorite snack too.  And don't worry, we worked on our "toss it in the air/catch it in your mouth" game...we are pros now!!

xo,
Kate


Wednesday, March 5, 2014

Sauteed Chicken and Quinoa with water chestnuts and dried cranberries

A quick, easy and delicious meal on the run...


Ingredients (feeds 2-4):
2 organic chicken breast, thinly sliced
1 cup cooked Quinoa
1/4 cup chopped green onions/scallions
1 8oz water chestnuts, chopped
1/2 can chickpeas
1/2 cup dried cranberries
1 avocado, sliced thin
Goat cheese to taste

Saute chicken in garlic salt and olive oil.  As the chicken is nearing done, add in scallions, water chestnuts, and chickpeas to warm up and sear slightly.  Toss the ingredients in a big bowl and let goat cheese add a creamy flavor.  The Cranberries add a yummy sweetness, but if you want a little more flavor, feel free to add this honey mustard vinaigrette on top!

It's a great warm weeknight dinner when your family is on the go.  Healthy and delicious!

Mangia!!
Kara, Kate, and Kacey

Tuesday, March 4, 2014

Baby Room Inspiration!

We're expecting a sweet little girl in May, and it can be so easy to get lost in a sea of pink the second friends and family find out:)

I really want to create a space in our tiny second bedroom that is girly, but still functional for other things (aka part time office, workout room, Rossi's closet...eh hem...).

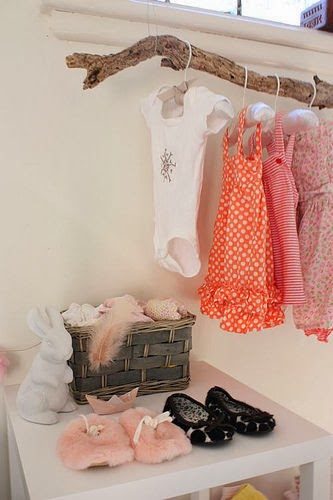
My sister in law, Natalie, sent me this picture... and I immediately fell in love with the color scheme! 


The subtle blush, almost champagne pink adds such a wonderful girl touch without going overboard.  Our walls are already sage green so I'm halfway there!  I want to bring in the beachy-driftwood element of the flooring...which I just found inspiration for:


How cute is the driftwood hanger to show off some of her fabulous clothes?! I see DIY projects in my very near future:)  I still need to figure out how to get the blush into the room.  It will probably be in the crib sheets.  I had the absolute pleasure of attending my first baby shower in Arkansas last week and THIS was the handmade table cloth our dear friends Tawana and Lynette had made:


IS it NOT the prettiest thing you've ever seen?  I now need that for my crib skirt!!!

I'll keep y'all posted on how this small space nursery turns out...wish me luck!!

LOVE LOVE:)
Kacey

DIY: Mardi Gras Mask


It's Fat Tuesday, y'all!

Otherwise (and less jarringly) known as Mardi Gras, today is the day to throw caution to the wind! Go ahead and binge, gorg, drink up life's pleasures to your heart's content!  Because Lent starts tomorrow and we throw ourselves into 40 days of restrictions..don't we?

Well, whether you do or you don't, what better way to celebrate Mardi Gras than by making your own Mardi Gras mask?  Legend has it that people wore their masks out on the Tuesday before Lent so they could frolic and play incognito.  This is a really fun, creative project! Options and designs are endless...would be great to do with kids too!

DIY: Mardi Gras Mask
Materials:
Mask
wooden dowels
craft paint and foam brush
glitter
hot glue/gun
clear craft glue
feathers
jewels
ribbons
sequins
generally any sort of bits and baubles you want to make your mask gorgeous!


1.) Paint mask a base color with a small foam brush.  I chose black paint.
2.) Once paint is dry, spread a skim of clear craft clue on mask and sprinkle on glitter.  
Once again, I went with black glitter.
3.) Using your hot glue gun, slowly glue on sequin border.  This is where you can 
start to get creative! use old beads, ribbon, shells, feathers, whatever!


4.) Wrap wooden dowel with ribbon, or paint a color of your choice.  
I wrapped the dowel with gold ribbon - hot glue the end of the ribbon to the dowel, 
wrap all the way down, then glue the bottom end.


5.) Hot glue the dowel to the back of the mask.  I also wrapped a purple ribbon around it.
6.) Attach feathers and jewels and ribbons!  I hot glued them to the back of the mask.
7.)  Tie on butterfly pin.


Viola!!

These would be very pretty and whimsical placed in a floral arrangement on your dining table, too.


You are free to masquerade, my dear :)
xo
Kate


Don't forget to keep up with SorellaStyles on Instagram! Follow us at:

@sorellastyles


Friday, February 28, 2014

Weekend Inspiration


It's Friday y'all!  Woo hoo!  I'm looking forward to this weekend.  If the rain stops, I'm hoping to do a little pre-Spring work on our deck.  Get everything ready to go before this baby comes :)

Here's a little collection of my favorite reads from this week...I hope they inspire you as they did me!


** A DIY project for this weekend - a modern beaded wood trivet from Apartment Therapy.

** Delicious homemade Ginger Tea recipe on Mind Body Green.

Have a lovely weekend!

xo
Kate, Kara, and Kacey