Showing posts with label Holiday Decorations. Show all posts

Tuesday, April 29, 2014

DIY Kitchen Chalkboard


I love an easy craft project that makes a big difference :)  And let's be honest, chalkboard paint could not be easier to work with.   Especially the spray paint version!  For quite awhile now I've been meaning to buy a magnet pad of paper to put on my refrigerator so I can jot down those grocery store items I need to buy that I think about in the moment of cooking but ALWAYS forget once I get to the store.  Does that ever happen to you?  

However, I've had this empty wall in my kitchen since we moved in.  I thought I'd get around to finding art or something to fill the hole eventually, but then I came across this old tray that I got at the flea market a hundred years ago.  Boom! Let's make a chalkboard, hang it in the empty space, and now I can add items to buy as I think of them.  Ahhhh I love efficiency.

DIY Kitchen Chalkboard
Old Tray
Painters Tape
Chalk

1.) Tape off edges of tray with painters tape.

2.) Spray chalkboard paint on face of tray.  
I sprayed 3 coats, taking about a 2 minute break between coats.

3.) Wait 24 hours. (Hardest part! Ah patience!)

4.) Cure chalkboard by covering the entire area with chalk.  
Wipe off chalk and voila!

5.) List away!


I had to add a small sawtooth picture hanger to the back of my chalkboard.  You can buy these at any hardware store - I happened to have some in my tool box.  They come with tiny screws, you just grab a screw driver and screw them into the back of your tray.  Then I attached some kitchen twine to the back, and hung the tray on the wall.

The Painters tape actually pulled off a little of the old paint from the original tray.  But it ended up making the sign look even better! Unintentional distressing :)


I love how it fills up that empty wall and lets me remember what I actually need from the store!  Win, win.

xo,
Kate

Thursday, April 17, 2014

Simple, Glittery Easter Table


Welcome to our Easter table!

For some reason, the Easter holiday always sneaks up on me.  Thanksgiving, Christmas - we have major build up for those guys.  But all of a sudden, spring has sprung, and Easter is here.  For that reason, I like to create really simple but festive tables for the spring holiday set up.  I actually had all of the items for this table - I just rummaged around all of my "hiding spots"....don't tell my husband how many hiding spots I actually have :)

This year we incorporated:


The DIY project for this year are these glitter filled easter eggs!

DIY Glitter Filled Easter Eggs
Clear Easter eggs from Michaels ($.99 each!)

1.) Take off top of clear egg and fill up with glitter.
I filled each egg about 1/4 of the way full.

2.)  Pop top back on egg.

3.) Using a glue ballpoint pen, write down names 
for place cards on a thin strip of white paper.

4.) Sprinkle glitter over glue.

5.) Brush off glitter (funnel back into tube to re-use).

6.) Roll both ends of paper for a fancier look.


 Each place setting has a slightly different look...
Kara: old wine corks add a festive feel
Kate: dried lavender from the garden
Kacey: small white stones and mini purple carnations
Sorella: A beautiful pink flower

You could also scoop up a whole bunch of these eggs, fill them with coordinating glitter and hang them  together all at random lengths with flowers behind it as a spring wreath.  Or even hang them at various heights from your chandelier over your Easter table.  A kind of grown-up mobile!


 We actually re-used the gorgeous flower arrangement from our Baby Shower last weekend! Our dear friend Alyson created the most stunning floral arrangements - and Kacey and I got to take a few home with us.   This was perfect for the table.


Aren't they beautiful? She is so talented!  And these flowers are still fresh almost a week later.  More pictures to come from the Baby Shower, I promise. We have a whole post dedicated to it.  Our friends and family did such an amazing job on the event...can't wait to share!

Happy Easter everyone - don't forget to light some candles and use whatcha got!  Get creative, but keep it simple...works every time!

xo,
Kara, Kate, and Kacey


Friday, March 21, 2014

DIY: Bell Send Off Wands


DIY projects are my happy place.  And when I successfully create a project that turns out lovely, yet is super simple to make?! Well call me doubly happy.  These Bell Wands are both lovely and easy to make.  I originally made them to use as Send Off Wands for the happy couple at the end of their wedding party.  However, these wands can be so much more than that! Make them with kids, use them in floral arrangements, spice them up with pretty ribbons for whatever holiday is coming up!

DIY Bell Send-Off Wands
Wooden dowels 
ribbon in colors of your choice,
mini silver jingle bells
OPTIONAL: Paint for dowels

2.)  Cut ribbon to size you want (length of dowel is good) and string on 2 or 3 bells.
3.)  Push bells close together on ribbon. 
4.)  Tie ribbon with bells on dowel.
5.)  Tie on any other ribbons you want to add color.
6.)  Hand out to your kids or guests!

**If you want to paint the wooden dowels to compliment your 
occasion, go right ahead! Do this first before you tie on ribbons.


This is such a fun and whimsical alternative to rice, bubbles, or lavender for a wedding send off.   And it is a great project to do with kids - magic wands anyone?

xo,
Kate


This photo shoot was featured and published on Love and Lavender.


Friday, March 14, 2014

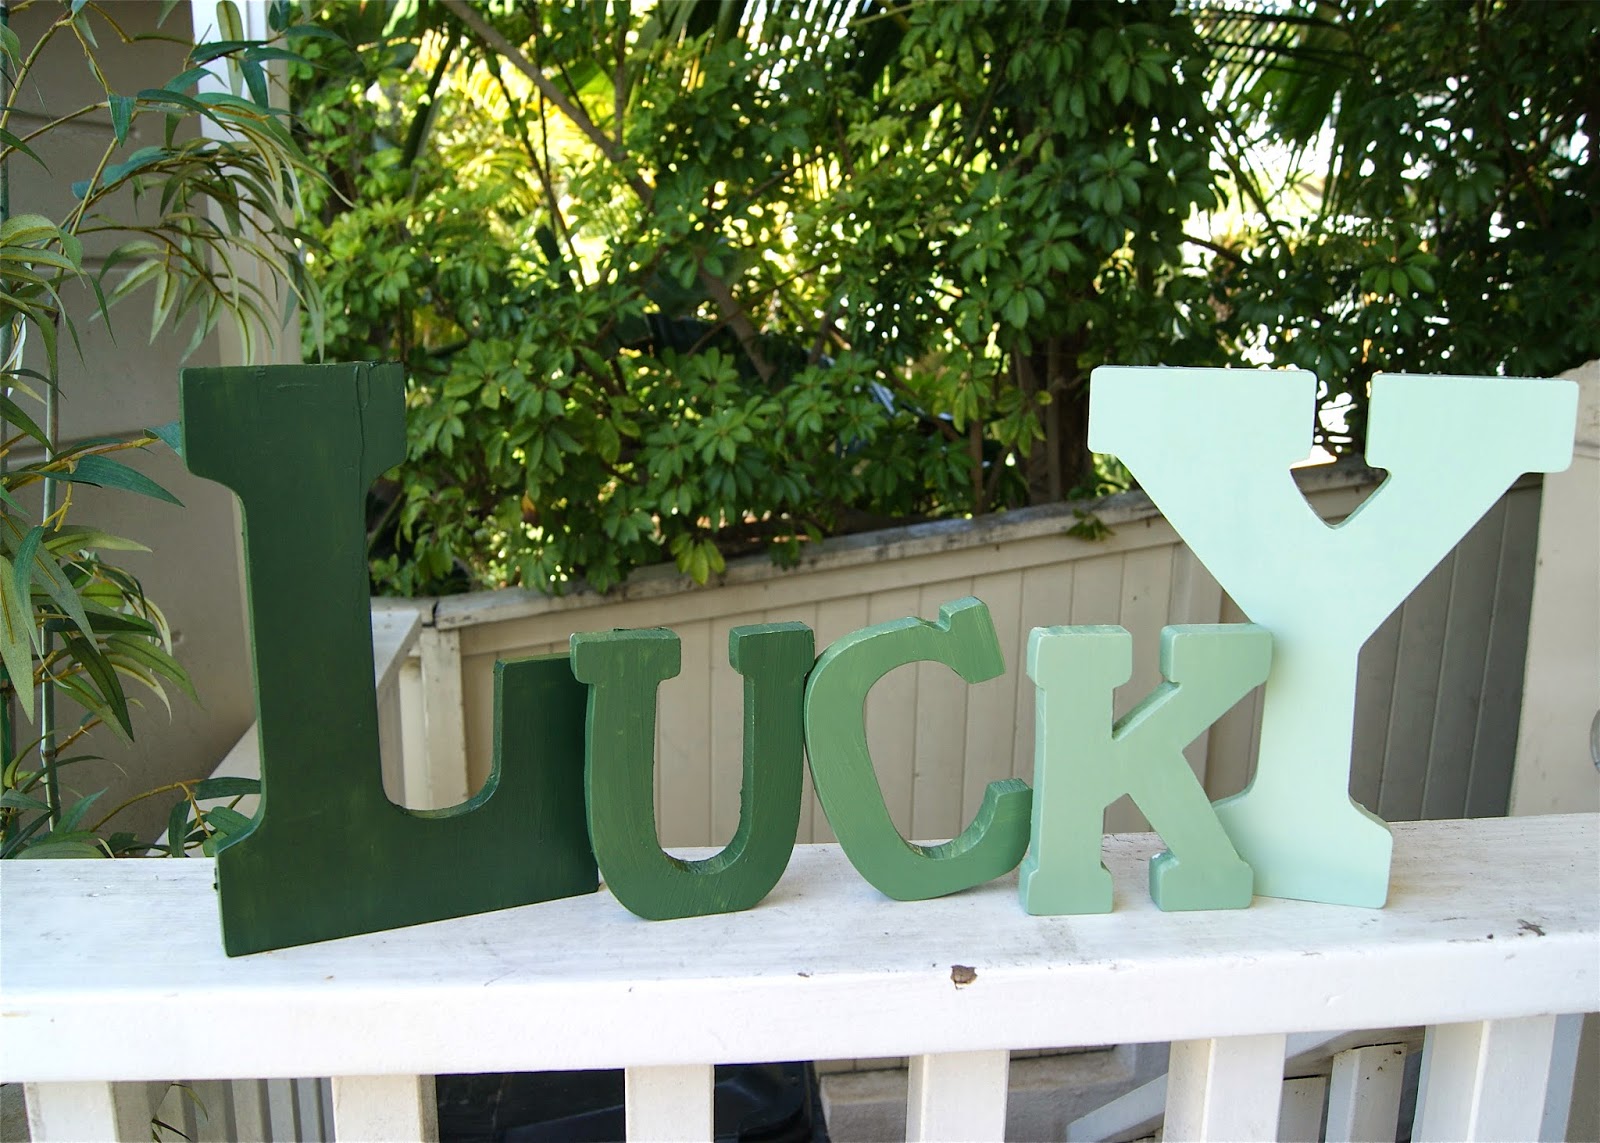
St. Patty's Day O'FUN!!! Ombre "Lucky" Sign


Who doesn't looooove a good holiday project??

I gotta be honest, I was having some trouble coming up with a fun St. Patrick's day project.  I didn't want shamrocks and pots of gold this year...just something classy, vintage-y, and fun to spruce up my house and invite the Luck O' The Irish in:)

(Side note: did you know that St. Patrick's Day is an official Christian holiday celebrating the arrival of Christianity in Ireland?  It always falls during Lent, and the Church lifts the restrictions on eating and drinking alcohol for this one day! Hence the fun filled, green beer obsessed holiday that it has now become...).

Anyhoo, I finally got inspired on a random trip to Michaels as I was meandering down the wood and paint aisle. Recently I had seen these cool ombre candlesticks online and...

EUREKA!  I knew what I wanted to do this year!

Ombre "LUCKY" letters!!  A fun little vignette to put up in the house...it's  pretty and reminds me of how "lucky" and blessed I am everyday:)  I thought adding the ombre look would spice it up a bit from just all one green color.  


SO.  I found the perfect wooden letters that would stand up on their own.  I chose a big L and Y to whimsy it up a bit.


I laid out the letters at home, along with the dark green and white all purpose paint I decided on.


There are a ton of greens and types of paint to choose from...It's up to you how dark you want to start your letters.


Then I started painting!  I used the darkest green on the 'L'.  A plastic bowl was perfect to hold the paint as I slowly added dollops of white to the green color to lighten it up.  A little white goes a long way, but it's trial and error to find the perfect ascending shades of green that you want for your sign.


I think the K could be just a scosh darker after I saw the final dried finish. I'll have to do that next time! 

This project was less than $20, and it was so much fun to get my hands dirty with some good old fashioned painting!  Like being a kid again!  I will DEFINITELY have to do a project like this with my daughter some day:)


Happy Irish Day!!
Kacey

Friday, March 7, 2014

DIY: Fabric Flowers


These fabric flowers are so versatile - you can use them in many different DIY projects!  Wreaths, centerpieces, lamp shade decor, pillow appliques...endless!

I used these flowers for the centerpieces in the DIY Picnic Wedding Style Shoot I designed for Wedding 101.  Kara used them in her Spring wreath she made last year.  Use your imagination - you'll find a spot for these babies!

Fabric Flowers DIY
Fabric (used felt for these)
Scissors
Hot glue

1.)  Cut felt into equal sized squares (the bigger the square, the bigger the flower).
2.)  Out of each square, cut a 5 petal flower (Does NOT have to be pretty or even).
3.)  Fold flower in half, then in 4ths.
4.)  Cut off very bottom edge and line with hot glue.
5.)  Glue bottom of flower to a scrap piece of felt that acts as the base of the flower.
5.)  Repeat with all the petals until you have the size flower you want.


Kara's Wreath:


Lamp Shades w/Flowers:


Wednesday, December 11, 2013

Christmas Tree Compromise...

It's a timeless, age old, never ceasing problem....

Colored lights, white lights....

Colored lights.....

White lights.....

Does your family debate this as much as my family does?  It's a tough problem to solve, your christmas tree can really set the tone for the whole season...so...what to do??

I've heard some of our friends and family have an "every other year" system in place.  That works too... 

....unless it ain't your year dearie:)

SO.  This is the compromise my hubby came up with this year...and I LOVED IT! It's brilliant AND beautiful!

Check it out...


I mean...I gotta give props to the hubby! He decided to HECK with this indecision on the light bulbs...let's do them BOTH!  

So we wrapped the colored lights very close to the trunk of the tree all the way down.  It only took one strand, and it creates this awesome 3-D look in the end.  The white lights dominate as they wrap around the outside, but the colored lights twinkle and glow prettily from the inside.  I love it.  It may have to become a new staple in the Morreale household:)


There ya have it friends, a quick and fun Holiday How To.

I hope you have a Blessed and Merry Holiday Season... and a Happy New Year too:)

Love and cheer!
Kacey

Tuesday, November 26, 2013

Thanksgiving Fall Wreath


It's here! It's here! Our favorite holiday of the year! Well, ok, one of them - but it's that most wonderful time of the year, right?  When Fall hits and every month is full of festivities, decorating, cooking, and celebrating.  Thanksgiving is such a great holiday - no pressure, just getting together with family and friends to celebrate all that we are thankful for.

We are all cozied up in Denver, Colorado currently...busily getting ready for Thursday.  We'll have about 20 people gathered around our table this year, so configuring the seating arrangements is challenging - but we're up for it!  A week or 2 ago, Kacey and I made a fun wreath for the door...

Indian Corn Thanksgiving Wreath
you'll need:
*Wreath frame (12 - 14" depending on how big you want 
the wreath to be; we used a cardboard frame)
*burlap ribbon
*approximately 30 small indian corns
*hot glue and gun

1.  Wrap burlap ribbon around wreath frame to hide cardboard. Hot glue ends to frame.
2.  Position corn around wreath first - don't glue yet.
3.  Slowly hot glue the corn to wreath, trying to keep the opening circle in the center as perfectly round as possible.
4.  Hang your wreath!  Once it's up, you can judge if any of the corn needs to be repositioned to make the center circle more perfectly round.  It's very simple to pop off the corn, reposition, and re-glue.


This also makes a gorgeous centerpiece for a table...just lay flat and position candles and food around it!

I'm off to Hobby Lobby - thanksgiving table decor here we come!

xo,
Kate


Tuesday, November 20, 2012

Thanksgiving Table: Quotes of Gratitude

If the only prayer you said in your whole life was,
"thank you," 
that would suffice.  
~Meister Eckhart

Thanksgiving.  A day to reflect on all the blessings we have in our lives and be grateful to God who makes it all possible.  It really is such a beautiful holiday - one I wish I lived more consciously every day.

Our Thanksgiving table has always been a fun project that my whole family creates together.  Each year we try to top the year before, or at least come up with something completely different.  But candles and colors aside, it's important to remember why we all come together on Thanksgiving.  Last year we tied quotes of gratitude and thankfulness onto sprigs of rosemary and stems of pears and set one on each plate.  Every quote was different - some funny, some serious, some famous, some unknown.   Each person read their quote out loud during dinner.  It was a lovely way to celebrate the season and be ever mindful of the spirit of Thanksgiving.


Gratitude Quotes
Google "thankfulness quotes", "thanksgiving quotes", 
"Gratitude quotes" or any combination of the above and pick out your favorites. 
Hand write or print out the quotes (in small text) on paper.
Roll up quote in a scroll-like fashion.
Tie scroll onto a sprig of rosemary or a stem of a piece of fruit with colorful ribbon.


Monday, November 19, 2012

"Turkey" Veggie Tray

Are you still looking for something you can make to contribute to all the Thanksgiving events this week? Try this Turkey Veggie Tray.  It is fun and festive - a great project to enlist some little ones to help assemble as well!


Lay out butter leaf lettuce on the bottom of a large plate.  Then add your veggies: A row of carrots, broccoli florets, thinly sliced red and yellow bell peppers, and zucchini.  Save the top of the red bell pepper to make the turkey's face, and slice up some zucchini to make the legs.  Add 2 little eyes (from some cauliflower) and you're done!  Pair with homemade hummus or your favorite dips.

And be sure to let people know it's ok to "ruin" the turkey - it's almost too pretty to eat!


xo,
Kara, Kate, and Kacey