Pages

Friday, February 28, 2014

Weekend Inspiration


It's Friday y'all!  Woo hoo!  I'm looking forward to this weekend.  If the rain stops, I'm hoping to do a little pre-Spring work on our deck.  Get everything ready to go before this baby comes :)

Here's a little collection of my favorite reads from this week...I hope they inspire you as they did me!


** A DIY project for this weekend - a modern beaded wood trivet from Apartment Therapy.

** Delicious homemade Ginger Tea recipe on Mind Body Green.

Have a lovely weekend!

xo
Kate, Kara, and Kacey

Thursday, February 27, 2014

Inspiration Boards...

Kishani Perera's office - the board that got me going this morning.


Ahhh Inspiration Boards.   I just love 'em.  Can't get enough of 'em really.  They always make me so excited about the future....and they make me desperately want to make one for my own house.  So in the spirit of JUST DOING IT, I've decided I will make one within the next month.  The perfectionist side of me is constantly putting off projects, simply because I haven't got the perfect plan or the perfect materials.  Well, I say no more to that!  My new goal is to just start! Just start creating and making and doing and all the good stuff will start flowing in....

Here is a round up of some very inspiring Inspiration Boards:


I love this one! It's wild and chaotic and so invigorating.  Plus, I'm hoping to put my board in our sun room over the sofa, so this is a good picture to leap off of.


Seems simple enough - pop some chicken wire up on the wall and buy some clothespins.  A minimalist approach to a mood board.


I love how this one is almost spilling off of the board and onto the shelf it's leaning on....it's like a physical representation of your dreams jumping off the page!


An old crib spring!? You really can turn trash into treasure!  Fun pop of color too.


Pretty office space...check out the whole post on Glitter Guide.


Side by side dream boards.


A big inspiration board! Leaning on the floor behind the desk...nice for a home office.


I love the detail of this one....ornate gold frame, pretty wall paper or fabric as the back drop...that's all the inspiration you need!

Alright dearies, I'm saying it here! Pictures of my new inspiration board to come...:)

xo
Kate

Wednesday, February 26, 2014

DIY: Glittery Snowflake Note Cards


DIY Glittery Snowflake Note Cards


You'll Need:
Plain note cards
Pattern Punch-er
Glue pen (purchase here)
Paper/Craft Glue (clear)
Glitter (purchase here)
small foam brush

Version #1
1.) Take your plain note card and punch your chosen shape into front flap of note card.  We chose a wintery snowflake.


2.) Set aside the cut out snowflake for later use.  


3.) Carefully trace the inside of the cut out pattern with Glue Pen - this will be the inside of the card.  Quickly sprinkle with glitter before the glue pen dries, and let the glitter sit for a minute or two.


4.) Gently shake off excess glitter.  I shake mine into a plastic cup so I can re-use the glitter later.  No sense wasting perfectly good glitter, right!?

5.) Lightly spray the glitter snowflake with hairspray - don't soak, just mist.  This will help hold glitter in place.


7.) Viola! Version #1 is finished!


Version #2:
1.) Take the snowflake cut outs you set aside and brush both sides with clear paper glue using a small foam brush or paint brush.

2.) Working quickly, glue down snowflake on inside of card so it fits in it's cut out spot when the card is closed.  Sprinkle the snowflake side facing up with glitter and let dry.  Brush off excess glitter after a couple of minutes.


And you're done.  These make really sweet little note cards.  I'll be using mine in these last days of winter for "Thank You" notes and "Thinking Of You" cards.

Enjoy!

xo,
Kara, Kate, and Kacey


Tuesday, February 25, 2014

Oversize Blueberry Muffins (with Crumble Topping)


I haven't had too many cravings while I've been pregnant.  Mostly I've noticed that things I normally love to eat I just cannot even stand to think about now.  However last week I saw a commercial on TV that featured giant, steaming blueberry muffins coming out of the oven.  I could not stop thinking about them!  Luckily I had all the ingredients in my kitchen to whip up a batch of delicious homemade muffins right then and there.  We always keep frozen blueberries in the freezer to use for smoothies...fate? I think so :)

Homemade Blueberry Muffins 
(with Crumble Topping)
Makes 12 oversize muffins

Muffins:
3 cups Flour
1 1/2 cups sugar
1 tsp salt
4 tsps baking powder
2/3 cups vegetable oil
2 eggs
2/3 cup milk
2 cups frozen (or fresh) Blueberries

Crumble Topping:
1 cup sugar
2/3 cup flour
1/2 cup butter, cubed
3 tsp ground cinnamon

1.) Grease regular muffin tin with Pam.  Even if you use cupcake liners, 
be sure to grease the top of the pan as these muffins 
really "pop-over". Heat oven to 400 degrees.

2.) Combine the flour, sugar, salt and baking powder in a mixing bowl.  
In a separate mixing cup, mix together vegetable oil, eggs, and milk.  
Pour liquid mixture into dry mix and gently combine. 
Fold in blueberries until just mixed through.

3.) Pour batter into muffin cups - all the way to the top!

4.) Combine all Crumble topping ingredients (sugar, flour, 
butter, cinnamon) with a fork.  Sprinkle over top of muffins.  
Bake for 20-25 minutes until done.

These are SO easy to make! And leaps and bounds tastier than muffin-in-a-box mix.  Next time the craving hits, I will be whipping these babies up....hmmm.  Looks like I'm headed into the kitchen to make them now!


Monday, February 24, 2014

Flea Market Finds

Indian rugs, Moroccan tiles, woven baskets

Last weekend my husband and I were able to get away and head down to Long Beach for the flea market they hold there once a month.  I always want to go, but you now how things get - all of a sudden another month has gone by, and I didn't make it again.  So I was thrilled when we actually got to go!

I could buy a million things there...it's so much fun to root through all the "treasures".  Here is a collection of my favorites from February!

Above photos - clockwise from top right:
1.) Moroccan Tiles - Gorgeous as coasters on coffee table or lined up along a windowsill or wall shelf
2.) Woven baskets - perfect for a picnic or a day at the beach...or flea marketing!
3.) Indian Rug - beautiful colors, good prices.


Clockwise from top left:
1.) Brass lamps - the little children frolicking would look so chic in modern nursery and they must be paired with black lamp shades!
2.) Brass Basket - You can never have too many of these.  Use as a magazine holder, trash bin, toy catchall...
3.) Geodes -  I LOVE rocks! These would make gorgeous paperweights or would look pretty sitting on a stack of coffee table books.
4.) 4 Poster Twin Beds - So fun for a children's room.  These were jet black and tall...they made quite a statement!


Clockwise from top left:
1.) Light up signs - this booth had all sorts of different signs that lit up with mini Edison bulbs.  We saw one that was a cursive LOVE and we almost pulled the trigger for Bean's nursery.
2.) Woven chairs - a set of 4 unique woven chairs.  These would be great on a covered porch, or at a breakfast nook.
3.) Mini woven chair - this chair is tiny.  Child size. I loved it.  Fell head over heels for it! Didn't buy it. What was I thinking?!?!?!
4.) Blush dresser - this dresser was much more muted in person than it looks here!  I took this photo for Kacey - her nursery colors include blush pink...so cute!


Clockwise from top left:
1.) Jewelry Box - Such a precious addition to any dresser top or vanity.  Little drawers that hold your most prized jewels.
2.) Brass candlestick - nuff said.
3.) Ships Wheel - I think this would be super cute in a nautical themed nursery or kids bedroom (or adults room!) Hung on a dark wall....navy or emerald green...would make quite a statement.
4.) Leather bar stools - comfy, stylish, simple.


And finally:
1.) Gold plated flatware set -  Always a fun addition to dinner parties
2.) Rattan side table - this would add a ton of character to any room.

If only my house were big enough :)

xo
Kate

Tuesday, February 18, 2014

Orzo with chicken, chickpeas, and avocado tossed in Red Wine Mustard Vinaigrette

Need a quick, warm, yummy dinner this week?
Switch up your winter pasta with some feel good Orzo and add in whatever else you have in the fridge!  Once again, I found myself with no plan for dinner and 7pm looming quick.  So I threw 2 chicken breasts in the oven with some olive oil and seasoning, and put a box of Orzo in some hot boiling water.

Here's how it went down....:)

Pasta:
2 baked or sauteed chicken breasts (seasoned lightly and thinly sliced)
1 Box cooked Orzo Pasta
1 bell pepper (thinly sliced)
1 avocado
1 yellow onion
1 can of chickpeas/garbanzo
4 oz. Goat Cheese
Parmesan Cheese, Pepper to garnish

Red Wine Mustard Vinaigrette:
2 TBS olive oil
2TBS Red Wine Vinegar
2 TBS water
1-2 tsp lemon juice
1 TBS Honey Mustard
Salt and Pepper
1/2 packet Sweetener
(feel free to taste and add more or less of each ingredient depending on your taste!)

Sautee the onion and bell pepper in olive oil and some garlic salt.  Add all the pasta ingredients together.  The Goat Cheese will create a creamy yummy sauce over the Orzo.  Pour Vinaigrette over the top and toss all together. Add some Parm and Pepper at the end for a last minute zest and enjoy!

It was great piping hot that night or cold for lunch the next day!


Mangia!!
Kacey


Monday, February 17, 2014

Inspiration For Today

Happy President's Day! Hope everyone is enjoying the day and doing something fun if it's a holiday for you! So.... I was browsing Instagram this morning and came across a picture that really spoke to me and I wanted to share.

via tiu
 
Isn't that fantastic? It's that easy my friends.
How are you starting your day?
xo,
Kara

Friday, February 14, 2014

All You Need is Love

Today is a day to celebrate L.O.V.E.  It comes in all different forms and truly makes our world a beautiful place.  We hope that all of you are spending time with the ones you love today......husbands, wives, girlfriends, boyfriends, children, parents, friends and family.

via pinterest

This past week The Beatles 50th Anniversary special was on CBS, and their song "All You Need Is Love" inspired us today.

via pinterest


All You Need Is Love-The Beatles

Love, love, love.
Love, love, love.
Love, love, love.

via pinterest


There's nothing you can do that can't be done.
Nothing you can sing that can't be sung.
Nothing you can say but you can learn how to play the game.
It's easy.

via pinterest


Nothing you can make that can't be made.
No one you can save that can't be saved.
Nothing you can do but you can learn how to be you in time.
It's easy.

via pinterest


All you need is love. 
All you need is love.
All you need is love, love. 
Love is all you need. 


Happy Valentine's Day to all of you! Spread the LOVE. 

We are going to leave you with one of our favorite inspiration pictures for our summer porches/patios. We need to be sitting here now enjoying a glass of wine, a cheese plate and the ones we love. 
xo,
Kara, Kate and Kacey

via www.lifeingraceblog.com


Wednesday, February 12, 2014

Leftover Land! Crunchy Chicken Wrap

If you are anything like me, fellow Sorella Stylers, you haven't quite mastered the "cooking for 2" technique.  Maybe it comes from growing up in a massive Italian family.  My aunts and mother never cooked for less than 8 people and many times it was up to 80(Christmas, birthdays, graduations...any reason to celebrate)!!! 

Anyhoo, I typically make more food than my husband and I consume in one sitting which inevitably leads to leftovers.  And instead of eating the same exact meal that I cooked the day or two before, I really enjoy coming up with twists on the dishes that are already ready to go! 

SO.  Rice, chicken...these are typical staples in my kitchen that don't get consumed the first time around.  Add a couple of fun veggies and toppings and you've got yourself a party!  

The challenge tonight:

CRUNCHY CHICKEN WRAP!!

What you need:
Cooked, shredded chicken
Cooked rice
bell pepper, onion, tomato chopped up in vinaigrette
sour cream, cheese, cholula hot sauce, avocado 
Large Tortilla (white sticks together and crisps up better than wheat)

To add flavor, chop up the veggies and toss them in olive oil, red wine vinegar, salt, pepper, and lemon juice.  


Get a nonstick pan going on med/hi heat. Or you can use a panini press.
Build your tortilla! 
Start with the cheese, leaving at least 1 1/2 inches around the whole perimeter.


Roll up the tortilla, spray a little cooking spray on edges to help keep together in pan.  Start on the edge side first and cook 3-5 minutes on each side.

We found out the hard way that white tortillas crisp up a LOT better than the whole wheat ones, but each are equally delicioso!!


This meal can allow you to get super creative with flavors and ingredients! Corn, black beans, anything goes...per the usual in my kitchen most days!

Enjoy~~!!
Kacey

Monday, February 10, 2014

Will You Be My Valentine....snack?! Brownies with Homemade Cream Cheese Frosting


So easy! So cute!!

It's Valentine's Day y'all! If you're up to your ears in candy hearts and lace doilies for the kids at school, you might be in need of a delicious and festive pick me up.  In France, they call their afternoon snack the "gouter" (gooh-tay): typically sweet and served with tea or coffee.

I'm a fan already:)

So here's the deal.

Stop by your local Sur La Table, or any kitchen store.  I found varying sizes of these heart shaped cookie cutters for a very reasonable price of $.85! (The bigger ones are $1.25...you can decide how big you want your brownies to be). 

Then bake these delicious homemade gooey brownies that we've previously tested out on Sorella Style, or if you're in a major hurry, you can go the store bought route.  Let the brownies cool way down in their 13 x 9 pan before cutting out your heart shaped treats! I got about 14 mid sized brownies out of one recipe...and there are some delicious edges left over to snack on too:)

Cream Cheese Frosting Recipe:

4oz. organic cream cheese softened
1/8 stick of butter softened
8 oz (half a small box) confectioners sugar
1 tsp vanilla

Beat cream cheese, add in butter.  Slowly beat in Confectioners sugar as frosting gets fluffy and soft.  Mix in vanilla at the end and Voila!!  YUMMY cream cheese frosting!

I mean...sooooo delicious...I've always had a love affair with cream cheese frosting...now that I know how simple it is to make...I am in serious trouble!

Enjoy my Valentines!!  It's the little things...and this one is too yummy to pass up!

Love and hearts,
Kacey


Friday, February 7, 2014

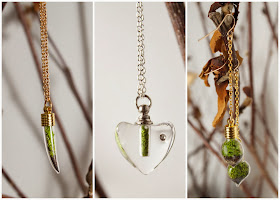
Spotlight: How to Wear "Spring" Around Your Neck!


We're all dreaming of Spring aren't we?  I know I'm longing to perk up my outdoor deck with color - bring on the flowers!  So why not bring a little "life" to your everyday jewelry?  Enter With Roots, a jewelry company based in Brooklyn that focuses on tiny terrarium jewelry.  Wha-huh? How is this possible?

Apparently the jewelry (necklaces, bracelets, and earrings) thrives off of close contact with your very own body heat and the exposure to everyday sunlight.  They contain reindeer moss, charcoal, and a small amount of soil.  Prices range from $40-$65. Not bad for a living piece of jewelry that survives because of your own personal eco-system!


Valentine's Day gift, anyone?  Check out this darling heart necklace...feel free to let my husband know :)

xo
Kate


Thursday, February 6, 2014

Cold Temps=Comfort Food

It has been absolutely freezing here in Denver the past few days.  No seriously, like negative 10 degrees freezing.  When you step outside it chills you to the bone. I am not a fan of this kind of cold.  And if we are being honest I don't really love the freezing temps combined with ice and snow much past Christmastime. I love a White Christmas complete with a sleigh ride and hot cocoa, but then spring might as well just pop up come January 2nd. :)  

I digress.....so while I was home today, I thought we needed some good for the soul, warm us up, comfort food.  One of my favorite hearty dishes in the winter is Bolognese.  It's easy to make and has our home smelling wonderful all day long as it simmers on the stove top.  One of my favorite go to recipes is Giada De Laurentiis' Simple Bolognese.  You can find the recipe here, or you can follow along with me. 

Giada's Simple Bolognese

1/4 cup extra-virgin olive oil
1 medium onion, coarsely chopped
2 garlic cloves, peeled and coarsely chopped
1 celery stalk, coarsely chopped
1 carrot, coarsely chopped
1 pound ground beef
1 (28-ounce) can crushed tomatoes
1/4 cup flat-leaf Italian parsley, chopped
8 fresh basil leaves, chopped
Salt and freshly ground black pepper
1/4 cup freshly grated Pecorino Romano


Heat Olive Oil in a pan then add Onion and Garlic.  Saute until onions are soft and start to become translucent. 


Add Carrots and Celery and continue to saute over medium heat for about 5 minutes


Add ground beef and brown until no longer pink-make sure to break meat down into smaller pieces


Add tomatoes, parsley and basil along with salt and pepper


Cook on low until sauce thickens and flavors meld together


*At this point I also like to add the cheese so its' flavor gets a chance to blend in as well. Giada's recipe says to wait until right before you serve.  Whichever you like is just fine-the more cheese the better as far as I'm concerned :)  I also like to double this recipe so I have some to keep in the freezer for an easy weeknight meal!


This is such a yummy dish for a cold winter day. It goes best with a slice of crusty ciabatta bread, and a generous glass of Chianti :)


Mangiamo!

xo,
Kara